Language
DeployMaster allows you to localize your installation software into any language you would like.
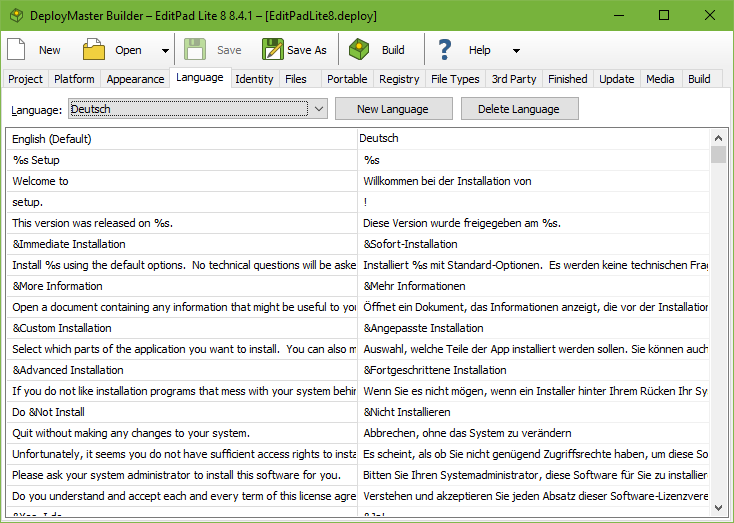
You can select any of the predefined languages from the drop-down list. If you would like to rephrase some of the text, simply edit it in the grid.
If your language is not present, click the New Language button. This will create a new language which will initially be identical to the default language (English). Translate all the strings in the grid. If you want your setup to be in English, but change some of the terminology, simply create a new language and edit those strings that you want to rephrase.
Any changes you make in the language grid will be automatically be saved in DeployMaster’s settings. The grid’s contents are not stored into your setup script, only the name of the language desired is. This means that if you correct a mistake in a translation you made, any setup scripts you previously created will automatically pick up the change.
All languages except for the default one are stored in separate .language files. These are stored in the user data folder that you can configure via the Advanced Installation button in DeployMaster’s installer. If you want to change this folder, run DeployMaster’s installer again and click Advanced Installation. You will not lose any settings or files if you do this without uninstalling DeployMaster.
If you have translated the strings into a new language, feel free to send the .language file to support@deploymaster.com. These files are plain text files. You can edit them with a text editor. Just make sure not to add or delete any lines in the file. Just translate the lines already present.
If you want your installer to use a language that does not use the same alphabet as Western European languages, you will probably need to select the proper font before you can make the translation. To select the font, click the Installer Font button on the Appearance page. Make sure to select the proper script when selecting the font. You can find the script option in the lower right corner of the font selection screen.
Here is a list of the strings DeployMaster uses in the installation software it creates along with an explanation where you can find the strings in the final result. These explanations should help explain the context to make a good translation possible.
English The name of the language. Used in DeployMaster Builder (to build the drop-down list on the language page), but not in the produced setup software.
%s Setup The caption of the setup dialog box. %s is replaced with CompanyName ApplicationName VersionNumber as specified in the
Project tab.
setup. These two strings are used to form the phrase: “Welcome to <Company> <AppName AppVersion> setup.”
This version was released on %s. Shown right below the previous string. %s will be replaced with the release date you specified, expanded into the long date format using the user’s settings from the Regional applet in the Control Panel.
&Immediate Installation
Install %s using the default options. No technical questions will be asked.
&More Information
Open a document containing any information that might be useful to you before installing this software.
&Custom Installation
Select which parts of the application you want to install. You can also modify an existing installation by adding or removing components.
&Advanced Installation
If you do not like installation programs that mess with your system behind your back, Advanced Installation allows you to monitor and adjust the installation in all its detail.
Do &Not Install
Quit without making any changes to your system. Captions and hints of the
five buttons that are presented to the user when she executes your setup package. The ampersand (&) in a caption makes the letter that follows it a hotkey, i.e. the user can switch to the associated control by pressing Alt+hotkey on the keyboard. Be careful not to use the same hotkey twice. The hint is shown in the area to the right of the buttons, when the mouse pointer is hovering over the corresponding button.
Please ask your system administrator to install this software for you. These two lines are shown if DeployMaster detects that the user does not have sufficient access rights to the system to install software. This will only happen on Windows NT, 2000 or XP if the user is not an Administrator or Power User. On Windows Vista and later, your setup will automatically request elevation to Adminstrator rights, which involves a security prompt when using Vista’s default security settings.
Do you understand and accept each and every term of this license agreement?
&Yes, I do
&No, I do not Print Please provide the following details:
Your &name:
Please type in your own name.
Your &company:
Please provide the name of the company you work for.
Product &serial number:
Please specify the serial number printed on the software’s installation media.
Product ®istration code:
Please enter the registration code which you received when purchasing this software. Caption and hint pairs used to build the optional
identity request screen, instructing the user which information needs to be supplied. Of course, nothing prevents you from giving these another meaning. You could change “product serial number” to “membership card number” if your software is for members only. When assigning hotkeys, keep in mind that a proceed and abort button will be shown too, using two of the captions right below.
&Proceed
&Abort Button captions that allow the user to indicate he (thinks he) provided the requested info and wants to go on or to abort the installation. Note that the third caption reads abort and not cancel. “Abort” means “stop where you are” and “cancel” means “stop and go back where you came from”. Except for cleaning up temporary files, nothing is being undone (which cancel would imply).
Program &Files folder:
&Common Files folder:
&Start Menu folder:
&User data folder: When clicking on the Advanced Installation button, the user has a chance to
specify which folders the application should end up in. These are the captions for the edit controls used for that purpose. The hotkeys should not conflict with those of the three button captions right above.
The second screen in Advanced Installation allows the user to select which
file associations can be made and which not. Above the checkboxes, this caption is show.
Cancel Generic captions for OK and Cancel buttons.
Installation will use %s. That is %d%% of the available disk space. String used in the
component selection screen to indicate the disk space required. %s is replaced with the number of kilo/mega/gigabytes needed. %d%% is replaced with the percentage of free disk space this represents.
When arriving at the
component selection screen after clicking on the Advanced Installation button, the user can mark a checkbox showing this label. When marked, DeployMaster will show him all the files that will be placed on his computer’s hard disk. The standard view only shows the component names, as not to confuse users with limited experience regarding computers.
Deploying file %s...
Creating shortcut %s...
Creating registry items...
Creating file associations...
Removing files that are no longer needed... These captions are shown together with the progress indicators during the installation.
%s has been successfully installed on your system
Thanks! To complete the installation, your computer needs to be rebooted
Reboot now
Reboot later Text and two button captions shown when all files have been copied, but a system reboot is necessary to complete the installation.
Please insert disk %d When
splitting the setup into multiple files this text is shown when the next file is needed. %d is replaced with the file’s number. The most common reason to split a setup is to spread it across multiple physical disks when one disk is not large enough to hold the entire installer. File numbers then correspond with disk numbers.
Shown when DeployMaster detects that a copy of your software has already been installed. %s is replaced with the application’s name.
The version in this setup package is more recent than the one you have already installed.
Proceeding will upgrade the copy on your computer to this new version. Two lines shown when the existing version is older.
This is the same version of the application in this setup package.
If you wish, you can select different components now and your system will be updated.
Newly selected components will be installed and components marked for deletion will be removed. Three lines shown indicating that the user is installing the same version, reminding her of the fact she can change which components are installed and which not.
This setup package contains an older version of this application.
Though not recommended, you can downgrade your existing installation to this version. Two lines shown when the existing version is more recent, discouraging the user to revert to the old version (but not preventing him from doing so).
Continuing with this operation will completely remove %s from your system.
Are you sure you want this to happen?
Note that you can remove or add individual components of this application by running the original installation program again. This text is shown by the UnDeploy application when the user selects your application to be uninstalled through the Control Panel, asking if the user wants to continue with the uninstallation or not.
%s has been successfully removed from your system.
Some files could not be uninstalled right now, because they are in use by Windows.
They will be removed the next time you start up your computer. This text is shown after UnDeploy has completed its work. If some files could not be deleted because they were still in use, the user will be notified of that.
You need administrator privileges to uninstall %s. Shown by UnDeploy when it cannot obtain the administrator privileges needed to uninstall an application that was installed for all users or that was installed for the current user requiring admin privileges.
Remove %s Caption used for the uninstall shortcut that DeployMaster can automatically create in %APPMENU%. (The option for this is on the
Finished page.)
Do you wish to continue with the installation? If an error occurs, an error message will be shown. The first line will be shown above the actual error message, announcing the error, the second line is shown below the actual error message asking the user if the installation should continue or be aborted.
You have aborted the installation.
%s has been installed. Remember that errors have occurred. If an error occurred during the installation, one of the two above lines is shown instead of “%s has been successfully installed on your system”. The first line is shown if the user selected to abort the installation, the second one if the user chose to continue anyway. %s is replaced with the name of your application.
The application will not be installed properly and may not function.
This is not an essential part of the application, so continuing the installation should not cause any problems. When an error occurs and DeployMaster asks the user if the installation should continue or be aborted, it will try to help the user by indicating the probable severity of the error. If the error is probably severe, the first line is shown. Otherwise, the second line is shown.
Unable to extract %s from the installation package. The package has most likely been damaged. Please contact %s to obtain a new one.
Unable to create the file %s on your computer.
Unable to create the folder %s on your computer. These items are used to construct meaningful error messages in case something goes wrong during the installation.
Please specify a valid path for each installation folder. This error appears in a popup message when the user types in an invalid path during advanced installation.
There is not enough free disk space on drive %0:s for this application. The installation requires %1:s of space, but only %2:s is available. This error appears in a popup message when the user proceeds from the component selection screen with more components selected than fit on the target drive. Though this is rare with huge modern hard disks,
portable installations are often created on devices with very limited space.
Install the application onto a removable medium like a USB stick or memory card, without making any changes to the host computer. Caption and hint for the Create Portable Installation button in the
welcome screen of your setup. You can enable this button on the
Portable tab in DeployMaster.
Drive
Volume Label
Free Space
No disk or card inserted
Treat &all drives as removable drives
You can type in the name of a &folder that should be created for this application: Labels used to build the
drive selection screen that appears after clicking the Create Portable Installation button.
Its installation program has been started.
Please download and install it from:
This application requires %s to be installed. Labels used to indicate that the application requires a 3rd party package to be installed. Your setup program will display this screen while it waits for the 3rd party installer to finish its job. If the 3rd party installer is not available, the setup will display the download URL and stay stuck at this screen until the user finishes downloading and installing the 3rd party package, or aborts the setup.
You can only create a portable installation on a personal storage device. This appears instead of “Please ask your system administrator to install this software for you.” when the user does not have sufficient rights to install software, and the portable installation option has been enabled on the
Portable tab in DeployMaster.
To continue with the installation, please close the application first and then click Retry.
To continue with the installation, please close the window with caption “%s” first and then click Retry.
To cancel the installation, click Cancel. This message is shown if your setup detects any open windows that use one of the window classes or window captions that you’ve specified on the
Update page. The message will have standard Retry and Cancel buttons.
Install %s into a personal folder and create shortcuts and file associations only for your own Windows user account. This does not require administrator privileges.
Install %s into a system folder and create shortcuts and file associations only for your own Windows user account. This still requires administrator privileges.
Install for &all users
Install %s into a common folder and create shortcuts and file associations for all Windows accounts on this PC. This requires administrator privileges.
Captions and hints of the
two buttons that allow the user to choose between an installation for the current user or one for all users after clicking the Advanced Installation button if you enabled both choices on the
Project page.