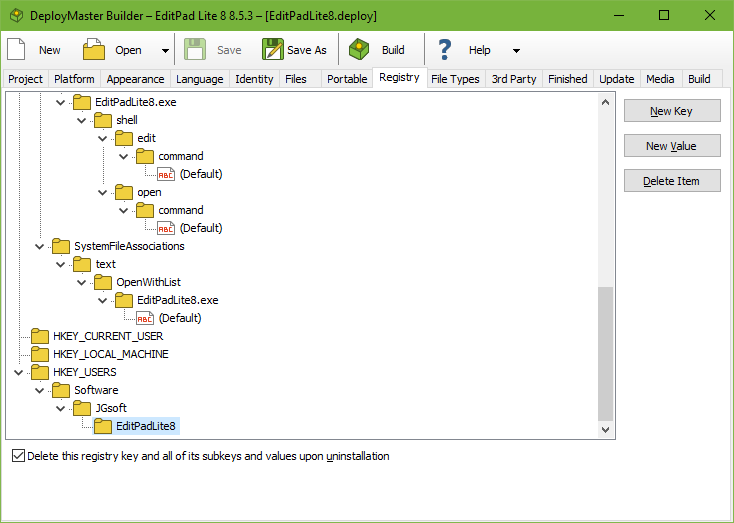
If you want certain registry keys to be created by the installation program, add them to the registry page.
To add a registry key, select its parent key, click the New Key button and enter the new key’s name. To add a registry value, select its parent key or an existing value inside that key, click the New Value button, and enter the value’s name. To give a key a default value, add a value under the key named (Default) including the parentheses. You can rename a key or value by clicking on it in the tree, waiting a second, and then clicking again.
For each value, you can choose whether it stores a string, a dword, or bytes. Then you can enter the actual value. If the value already exists in the registry, it is overwritten with the new value unless you turn on “keep existing value”.
In addition to adding literal string, dword and binary values, you can also dynamically store information about the installation. In particular, you can store paths to folders and file names so your application knows where it was installed. To do so, simply create a string value, and make the value start with one of the standard folder names that you can use on the Files page. To store the path to myprog.exe in the installation folder, for example, create a string value of %APPFOLDER%\myprog.exe
The Registry page supports two additional folders that you cannot use on the Files page. These are %SETUPFOLDER% and %SETUPDRIVE%. You can use these values to store the folder and the drive that the setup.exe was on at the time of installation. You can use these registry values to pass the installation source to your application, such as to access additional files that are not part of the setup.exe, but are put on the same CD.
For every third-level and deeper registry key, you can specify that it must be completely deleted upon uninstallation. When your application is uninstalled, the key and all of its values and subkeys are deleted, whether they were added by DeployMaster or not. An ever-increasing Windows registry can noticeably slow down the operating system, so your users will appreciate it if your software really cleans up after itself and also removes registry items.
The uninstaller also removes the individual registry values that you have added on the Registry page, even if you did not activate the option to have the value’s parent key deleted upon uninstallation. If you want to have the uninstaller remove specific values, you can add “dummy” values to the Registry page. These values are not be created or modified upon installation, but are removed upon uninstallation. If you turn on “keep existing value” and the value already exists upon installation, regardless of which kind of value it is, then that value is not removed by the uninstaller.
You can create registry keys under HKEY_LOCAL_MACHINE if you turned off “install for current user” or if you turned on “require admin rights” on the Project page. HKEY_LOCAL_MACHINE cannot be written to without admin rights. You can create keys under HKEY_CURRENT_USER only if you turned off “install for all users” on the Project page as user-specific registry keys are not appropriate for all user installs.
If you turn on both “install for all users” and “install for current user” and you turn off “require admin rights” then you cannot place any keys under HKEY_LOCAL_MACHINE or HKEY_CURRENT_USER per the above rules. In that case you can use HKEY_AUTO. This is not an actual registry key but a placeholder in DeployMaster. If the user chooses to install for all users, keys you put under HKEY_AUTO are created under HKEY_LOCAL_MACHINE. If the user chooses a user-specific installation then those keys are created under HKEY_CURRENT_USER. When your application wants to read the value, it should first look under HKEY_CURRENT_USER. If the value doesn’t exist there it should look under HKEY_LOCAL_MACHINE. You can use HKEY_AUTO even if you don’t allow the user to choose between an all-users and a user-specific installation.
Keys you put under HKEY_CLASSES_ROOT are created under HKEY_CLASSES_ROOT during installations for all users. But those keys are put under HKEY_CURRENT_USER\Software\Classes during user-specific installations.
Keys you put under HKEY_USERS are created under HKEY_CURRENT_USER during a user-specific installation. During an installation for all users, keys under HKEY_USERS are created for all users so that your application will see them when querying HKEY_CURRENT_USER regardless of the user account it’s running under. Normally, it’s better if your installer creates keys that all users need to see under HKEY_LOCAL_MACHINE. But if your application creates keys under HKEY_CURRENT_USER to store user-specific settings, then you can add those keys under HKEY_USERS to schedule them to be deleted upon uninstallation. If the application was installed for all users, then the uninstaller deletes keys under HKEY_USERS for all users. If it was installed for the current user only, then the uninstaller only cleans up keys you put under HKEY_USERS for the current user.
When checking whether your installer correctly created your registry values, you need to remember that HKEY_LOCAL_MACHINE\Software is segregated into 32-bit and 64-bit branches. Your installer will use the correct branch as long as you select the correct bitness on the Platform page. This comes into play when installing 32-bit software on 64-bit Windows. DeployMaster writes the values so that 32-bit software sees them under HKEY_LOCAL_MACHINE\Software. It’s best to use a 32-bit test program if you need to verify registry values that need to be visible to a 32-bit application. If you check with regedit.exe, which is a 64-bit application on 64-bit Windows, it won’t show the values under HKEY_LOCAL_MACHINE\Software because it is showing you the 64-bit branch. 64-bit RegEdit shows the 32-bit branch under HKEY_LOCAL_MACHINE\Software\Wow6432Node. Your application should never access that node directly.
DeployMaster also creates several other registry keys and values for its own purposes:
This information is used by DeployMaster to be able to update or uninstall your software. All these keys and values are, of course, automatically removed when your software is uninstalled.