On the Platform page, you can select which versions of Windows your installer should support.
First, you need to decide whether your installer will support 32-bit Windows, or 64-bit Windows, or both. If your software comes in 32-bit and 64-bit versions, you can package both into a single installer, or you can decide to have two separate installers for 32-bit and 64-bit. A single installer is easier for your users because they don’t need to figure out whether they need to download the 32-bit or 64-bit version. Separate installers may result in smaller downloads if your software has lots of files that come in separate 32-bit and 64-bit versions, like .exe files and .dll files.
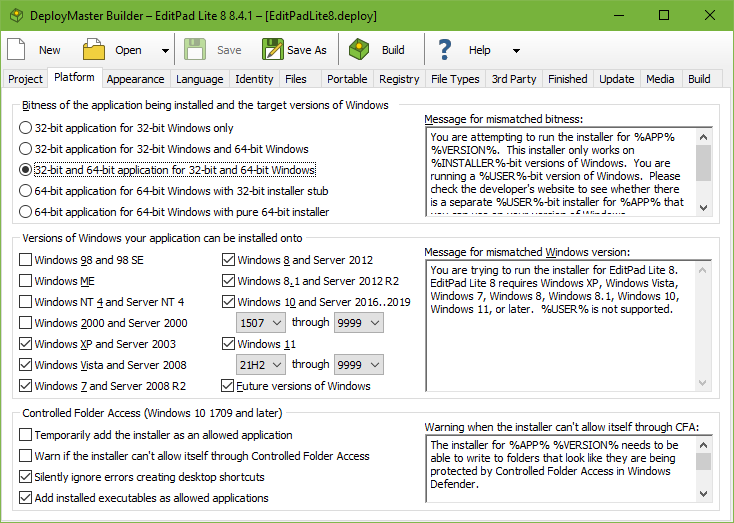
32-bit application for 32-bit Windows only: Choose this option if your application won’t work on 64-bit Windows at all, or if you’re creating separate installers for the 32-bit and 64-bit versions of Windows. DeployMaster will generate a pure 32-bit installer. The “message for mismatched bitness” will be shown when the user runs the installer on 64-bit Windows.
32-bit application for 32-bit Windows and 64-bit Windows: Choose this option if you only have a 32-bit version of your application and the 32-bit version of your application runs just fine on 64-bit Windows. DeployMaster will generate a pure 32-bit installer that will run just fine on all current 64-bit versions of Windows.
32-bit and 64-bit application for 32-bit and 64-bit Windows: Choose this option if you have 32-bit and 64-bit versions of your application, and you want to package both into a single installer. On the Files page you can indicate which files are for the 32-bit version, which files are for the 64-bit version, and which files are shared by the 32-bit and 64-bit versions of your application. DeployMaster will generate an installer with a 32-bit stub that extracts and runs a 32-bit installer on 32-bit Windows and a 64-bit installer on 64-bit Windows.
64-bit application for 64-bit Windows with 32-bit installer stub: Choose this option if your application requires 64-bit Windows, or if you’re creating separate installers for the 32-bit and 64-bit versions of Windows. A 32-bit stub is used so that the “message for mismatched bitness” can be shown when the user runs the installer on 32-bit Windows. The actual installer launched by the stub will be 64-bit. The installer will run fine on all present 64-bit versions of Windows. This option is recommended for 64-bit versions of end-user software.
64-bit application for 64-bit Windows with pure 64-bit installer: Choose this option if your application requires 64-bit Windows and you want your installer to support future versions of 64-bit Windows that may not be capable of running 32-bit software at all, or on servers where the administrator has disabled the WOW64 subsystem for running 32-bit applications. A system error message will be shown when the user runs the installer on 32-bit Windows. This error message will be cryptic, saying the setup.exe is not a valid executable, or simply “access denied”, depending on which version of Windows the user is running. This option is recommended for 64-bit server software that people won’t attempt to install on 32-bit machines.
Some of the platform options include a message for mismatched bitness in your installer. This message is shown in a message box when the user runs a 32-bit-only installer on 64-bit Windows, or a 64-bit-only installer on 32-bit Windows. You should replace the default message with a message that gives the user specific instructions how to obtain the correct installer for your software, or to tell the user that their version of Windows is not supported at all. You can use several placeholders in this message. %APP% represents the application name you’ve specified on the Project page. %INSTALLER% is replaced with 32 for 32-bit installers and with 64 for 64-bit installers. %USER% is replaced with 32-bit if the user has a 32-bit version of Windows, and with 64 if the user has a 64-bit version of Windows.
DeployMaster allows you to build a single installer that correctly installs your software on all versions of Windows since 1998. But your application may not support all those versions of Windows. Deselect the versions of Windows that your installer should not support. When the user runs your installer on a version of Windows that you’ve chosen not to support, it will show a message box with the message for mismatched Windows version. You can use several placeholders in this message. %APP% represents the application name you’ve specified on the Project page. %INSTALLER% is replaced with a slash-delimited list of the Windows versions your installer supports, such as “Windows 7/8/8.1/10/11”. %USER% is replaced with the version of Windows your user is running, such as “Windows 11 23H2 (2023 Update)”.
You can restrict support for Windows 10 and Windows 11 to a specific range of Windows 10 and 11 updates. Select the earliest and latest versions of Windows 10 and 11 that you want to support in the drop-down lists. For Windows 10 select 1507 and 9999 to support any version of Windows 10. For Windows 11 select 21H2 and 9999 to support any version of Windows 11.
The option for future versions of Windows allows your installer to run on Windows 12 or any version of Windows numbered greater than 11, if such a version of Windows is ever released. How well your installer and application will work on such a version of Windows will of course depends on how well Microsoft maintains backward compatibility with Windows 11.
Windows 10 version 1709 (Fall Creators Update) added a new feature to Windows Defender called Controlled Folder Access. It is disabled by default. It can be enabled via the Virus & Threat Protection settings in Windows Defender. Since Windows 10 version 1803 (April 2018 Update) this setting is labeled ransomware protection. This setting also exists in Windows 11. If enabled this prevents applications from writing to folders that are normally used to store personal files. That includes the Desktop and Documents folders. Additional folders can be added to the protection list. The standard folders cannot be removed from it. Even applications such as installers that run with Administrator privileges are blocked by Controlled Folder Access. If an application is to write to the Desktop and Documents folders, then it has to be added to the list of applications allowed through Controlled Folder Access.
When you enter a company name and application name on the Project page, DeployMaster automatically chooses default installation folders. None of these eight folders are protected by Controlled Folder Access (unless explicitly added by the user). When you add a new component to the Files page, DeployMaster adds a number of standard folders. When using the automatically chosen default installation folders, the only standard folder that is protected by Controlled Folder Access is the %DESKTOP% folder. So if you use only these default folders, then the only aspect of your installer that may be blocked by Controlled Folder Access is creating desktop shortcuts.
If the user has a 3rd party anti-virus or anti-malware solution on their PC, then Windows Defender is disabled on their PC. If you turn on any of the options involving Controlled Folder Access, then your installer first checks whether Windows Defender is operational. If it is not, then your installer ignores all these options.
Tick “temporarily add the installer as an allowed application” if you want your installer to automatically add itself as an application allowed through Controlled Folder Access, if Controlled Folder Access is enabled. It will do this after the user has clicked a button to start the installation and passed the elevation prompt to give the installer Administrator privileges. Windows Defender takes a couple of seconds to process the settings change. The installer needs to restart itself for the new privileges to take effect. It does this automatically. During all this the installer shows a progress meter making the user aware of this process. Some users may not appreciate installers that automatically change security settings. You’ll need to decide whether your installer does anything that may be blocked by Controlled Folder Access that is important enough to have it allow itself through.
The installer does not get Administrator privileges when installing for the current user without admin rights and when creating a portable installation. Then it cannot add itself or any other applications to the applications allowed through Controlled Folder Access. It will silently ignore the options to add itself and any installed executables as allowed applications.
If your installer places essential files in folders that may be protected by Controlled Folder Access, then you should turn on the option to warn if the installer can’t allow itself through Controlled Folder Access. Your installer then checks the Windows Defender settings in the registry to see whether it is being blocked by Controlled Folder Access. If it is then your installer shows the warning when the installer can’t allow itself through CFA. You should use the placeholder %FILE% in this warning to indicate the executable file that needs to be allowed through Controlled Folder Access. This file will be the actual installer in the user’s temporary files folder. It will not be the file that the user downloaded. That file is only a stub that extracts and runs the actual installer. It is the actual installer that needs to be allowed through Controlled Folder Access.
If your installer adds shortcuts to itself in %APPMENU% and %DESKTOP% then you may choose to silently ignore errors creating desktop shortcuts. Controlled Folder Access blocks the creation of desktop shortcuts. It does not block the creation of Start Menu shortcuts. If adding a desktop shortcut is the only thing your installer does that Controlled Folder Access doesn’t like, then you may want to turn on this option and turn off the previous two options. There’s no need to slow down your installer or bother the user with warnings and errors merely to create a desktop shortcut. The user can manually add a desktop shortcut later by dragging your application’s icon from the Start Menu onto the Desktop.
If your installed application needs to be able to save files in folders that hold personal data files, then you should turn on the option to add installed executables as allowed applications. All .exe files installed by your installer are then allowed through Controlled Folder Access. If you turned on the option to run some of them on the Files page, then they will have already been allowed through before they are run. The .exe files are added even if Controlled Folder Access is disabled. This way, they will be allowed through if the user enables Controlled Folder Access after your application was installed.
Again, this will only work when your installer runs with Administrator privileges. If the ability to save files in personal data folders is critical to your application, you may want to have it verify this ability on its own. When using the Win32 API, calling CreateFile() to create a file that does not yet exist in a folder that does exist fails and GetLastError() returns ERROR_FILE_NOT_FOUND if that folder is protected by Controlled Folder Access and your application is not allowed through.