The welcome screen above shows up immediately after the user launches a setup program built with DeployMaster. Unlike many other installers, setups created with DeployMaster do not being with a lengthy extraction or validation process. DeployMaster setups pop up instantly.
The welcome screen shows up without the typical security prompt that makes the screen go black. Administrator privileges are not needed to show a welcome screen, so DeployMaster does not request them at this point. This allows the user to confirm he’s running the right installer without giving it free reign of his PC. If the security prompt appears immediately, the user may click No and forget about your product.
Instead, the installer will request administrator privileges when the user clicks one of the buttons to commence installation and the chosen installation method requires administrator privileges. Installations for all users always require administrator privileges. Installations for the current user may or may not require administrator privileges. This is configured on the Project page. On Windows Vista and later, buttons that start an installation with administrator privileges show a little shield icon to indicate that the usual black screen security prompt will follow. If the user clicks Continue on the security prompt, the installer will proceed. If the user clicks No, the installer stays at the Welcome screen.
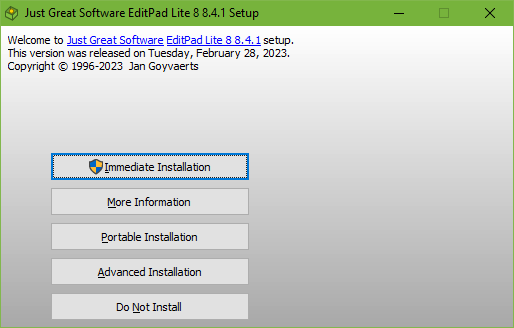
The welcome shows up to five buttons. When the mouse pointer is on top of one of them, a description of what the button does will be shown at the right.
Immediate Installation installs the application without asking any technical questions. This is ideal for inexperienced computer users. If the installer allows all-user and user-specific installations then it defaults to installing for all users if the user has administrator rights or their accounts supports elevation. It falls back to a user-specific installation if the user’s account does not support elevation.
More Information shows the readme file. This button only appears if a readme file was specified on the Project page while building the installer.
Custom Installation allows the user to choose what will be installed and what not. No other technical questions are asked. The installation will proceed immediately after selecting the components. This button only appears if some components were marked as user-selectable on the Files page while building the installer.
Create Portable Installation appears instead of Custom Installation button if the application can be installed in a portable manner. It will install the software on a removable medium without making any changes to the host computer. This means that only files will be copied. No shortcut icons, file associations, etc. will be created. Portable installations never require administrator privileges. Thus the Create Portable Installation button never shows a shield icon on Windows Vista and later and never results in a black screen security prompt.
Advanced Installation installs the application asking the user for the installation folder and which file types are allowed to be registered. The component selection which will show more detail, which is ideal for experienced computer users. If the installer allows all-user and user-specific installs then the user is given the choice on the next screen. This button can be removed via the Appearance page while building the installer.
Do Not Install terminates the setup straight away.