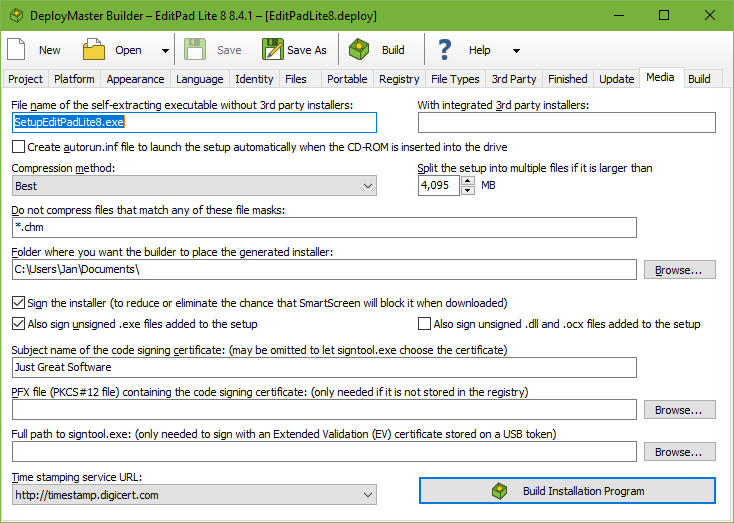
You should specify a meaningful name for your package, certainly if you are going to offer it for download. It is very hard for the user to find out which of the half a dozen setup.exe files she downloaded will install your application. Trying each of them is a waste of time. The best name you can choose is Setup_AppName_Version.exe. This makes it immediately clear that the file is an installation program and not a regular application, and which application and which version of it will be installed. Only if the package will be burned on CD-ROM, the ordinary setup.exe will do. Then the user can look at the disc’s label to find out which application it is about.
If you added external installers on the 3rd Party tab or turned on the .NET framework requirement, you can specify two names for the final setup.exe. The first one will contain just your files and settings, including the 3rd party settings, but not the actual 3rd party installers. Your setup.exe will look for the 3rd party installers in the same folder where you or the user placed the setup.exe. If they are missing, the download URLs are displayed instead. The second setup.exe will have all the 3rd party executables integrated into it. The setup.exe will still look for external installers in the same folder, and run those if present. If they’re missing, the integrated installer is extracted from the setup.exe into a temporary folder, and run them from there.
When distributing your application with 3rd party requirements as a download, you should build both the setup with and without the 3rd party installers. People who download your software for the first time can use the integrated download. People who are upgrading can use the “lite” download. Since the lite download still does the 3rd party checks, there’s no big problem if first time users don’t download the big package. When distributing your application on CD, you should use the installer without integrated 3rd party installers. Instead, place the installers separately on the CD along with your own setup.exe. That eliminates the step of extracting the integrated installer into a temporary folder.
If your setup doesn’t reference any 3rd party packages, then it doesn’t matter whether you specify the name of your setup in the first or second box. Only one setup.exe will be generated.
To create a CD-ROM that will automatically launch the installer when the user inserts the CD into the drive, turn on the option to create the autorun.inf file. Place this file together with the setup.exe in the root folder of the CD. There are no other requirements to make this work.
You can use several placeholders to insert the version number of the installer and the application’s release date in the file name of the generated installer and in its output folder. The output folder will be created if it does not yet exist when you build your setup.
%VERSION% inserts the Application Version exactly as you specified it on the Project page. %VERSION09% inserts the Application Version stripped of all characters that are not digits. If the Application Version is “1.2.3 BETA” and you specify “SetupMyApp%VERSION%.exe” as the file name for the installer, then the final name of the installer will be “SetupMyApp1.2.3 BETA.exe”. If you specify “SetupMyApp%VERSION09%.exe”, then the final name will be “SetupMyApp123.exe”.
%DATE% inserts the release date specified on the Project page, formatted using the short date format specified in the regional settings in the Windows Control Panel on your development PC. If that date format includes slashes, those will be removed, as they are not valid in file names. Other characters such as hyphens or spaces will be preserved. If your computer’s default date format produces something like 18/Sep/2012 then “SetupMyApp%DATE%.exe” becomes “SetupMyApp18Sep2012.exe”.
%DATE09% also inserts the release date using the date format specified in the Control Panel. If that date format uses (abbreviated) month names, DeployMaster uses month numbers instead. All characters that are not digits are stripped from the date. If the default date format produces something like 18/Sep/2012 then “SetupMyApp%DATE09%.exe” becomes “SetupMyApp18092012.exe”.
%YYYYMMDD% inserts the release date in YYYYMMDD format. The benefit is that “SetupMyApp%YYYYMMDD%.exe” will always yield something like “SetupMyApp20120918.exe”, which allows your installers to be displayed in the proper order when a file manager sorts them alphabetically by file name.
You can use multiple placeholders at the same time. “Setup MyApp %YYYYMMDD% %VERSION%.exe” will produce “Setup MyApp 20120918 1.2.3 BETA.exe”. This is a very descriptive name for your installer. Multiple versions will be in the proper order when sorted alphabetically.
By default, DeployMaster automatically compresses all files that it puts into your setup.exe. DeployMaster uses the LZMA algorithm which achieves high compression ratios thus producing smaller setups that can be downloaded faster. But the LZMA algorithm is quite slow when compressing. While testing your installer on your own PC or local network, you can set “compression method” to “none” to significantly increase the speed at which DeployMaster builds your installers. When building the installer you will deliver to your customers via the Internet, set “compression method” to “best” to significantly reduce the size of the generated installer. If you work in an environment where the size of the generated installer does not matter much, you can choose the “average”, “faster”, or “minimal” compression methods to increase the build speed at the cost of a larger generated installer. The speed at which the installer decompresses the files does not change noticeably with increased compression.
If your installer includes files such as video files, music files, or image files that already use compressed file formats, you can add their file masks to the list of files that should not be compressed, e.g.: *.avi;*.mkv;*.mp?;*.jpg;*.png;*.gif. Then DeployMaster will add those files to your setup.exe without attempting to compress them. If your installer includes many such files, this will significantly increase the speed at which your installer is built if “compression method” is set to anything but “none”. As long as all the file masks only match incompressible files, then the size of the generated installer will remain the same.
DeployMaster can create installers of any size and allows you to add files of any size. Files and installers larger than 4 GB are no problem for DeployMaster. But Windows itself does not support .exe files larger than 4 GB. Some file systems, such as FAT32, also do not support files larger than 4 GB. If your installer is larger than 4 GB, DeployMaster will automatically split it into multiple parts of 4095 MB. The first part will be the self-extracting executable with the name you’ve specified. The other parts will have the same name with numbered extensions, e.g. setup.001, setup.002, etc.
You can specify a smaller size than 4095 MB. The minimum split size is 3 MB. If you want to distribute your software on CD-ROM, set it to 650 MB so each part of your setup will fit onto a CD.
You can also specify which folder the build package should be placed in. This should be a hard drive folder, so that there is enough free room for the entire installation package. Even if you select to split the setup into pieces, the whole package must fit on the drive while building. If there is not enough free space, the build will fail.
Recent versions of Windows, Internet Explorer, and other web browsers display warnings and security prompts when the user tries to run software downloaded from the internet. These warnings are more severe for applications that are not digitally signed. Anti-virus and anti-malware tools also check digital signatures as part of their checks. Digitally signing your installer and your actual software is strongly recommended.
In order to digitally sign your installer, you need an Authenticode certificate. Authenticode is the specific name for code signing certificates for Microsoft Windows. You can purchase such a certificate from DigiCert, GlobalSign, Sectigo, or Entrust. The only difference between these providers is how much it’ll cost and how many hoops you’ll have to jump through to prove your identity, which may differ depending on which country you’re in. GlobalSign is based in Europe, while the others are in the US.
To properly sign a setup.exe built by DeployMaster, you have to let DeployMaster do the signing while building the setup. While you could sign the setup.exe afterwards, that is not sufficient. If you sign the setup.exe afterwards, you’ll only sign the installer stub. You can’t sign the actual installer(s) stored inside the setup.exe after it has been built. For a combined 32-bit and 64-bit setup.exe, there will be two actual installers inside the setup.exe. The setup.exe extracts the actual installer into the temp folder and runs that to perform the installation. In order to allow user-specific installs and portable installs by non-administrators, the setup.exe does not request administrator privileges when the user runs it. The actual installer will request administrator privileges when the user clicks one of the buttons create an installation for all users. This means that Windows will check the digital signature on the actual installer that was extracted into the temp folder rather than the signature on the setup.exe. Thus, if you don’t let DeployMaster sign your setup, Windows will indicate your installer is unsigned, even if you manually signed your setup.exe after DeployMaster built it.
Which of the settings you need to use on the Media page to have DeployMaster sign your installer depends on where your code signing certificate is stored. Normal (OV) code signing certificates can be stored in the Windows registry or in a PKCS#12 file or PFX file with a .p12 or .pfx extension. You cannot use certificates stored in PKCS#7 files with a .p7b extension. The PKCS#7 format does not include the private key, which is necessary for code signing. Extended Validation (EV) certificates must be stored on a hardware token, typically a USB key. EV certificates cannot be stored in the registry or in a PFX file.
If your certificate is stored in the Windows registry then enter the subject name of the code signing certificate to tell DeployMaster which code signing certificate it should use. You must type in the name exactly as it is on the certificate, including any punctuation. When you check the details on your certificate, Windows indicates this name in the “Issued To” or “Subject” field. This is also the name that appears on security prompts when the user runs your installer. If the certificate is in the registry then you don’t need to provide the PFX file or signtool.exe. DeployMaster can retrieve the certificate from the registry and apply the signature.
If your certificate is stored in a PFX file and you do not want to import it then you need to specify both the subject name and the full path to the PFX file. You don’t need to provide signtool.exe. DeployMaster can load the certificate from the PFX file and apply the signature. If your .pfx file is protected with a password then DeployMaster will prompt for the password when needed. DeployMaster keeps the password in memory as it is needed several times while building an installer. You will be prompted only once for the password when building multiple installers in a single DeployMaster session using the same certificate. DeployMaster does not provide an option to store the password. There is no way to do that securely. If you want to automate the build process without a password prompt, double-click your .pfx file in Windows Explorer. Follow the wizard to import your certificate into the Windows registry. Do not turn on the option to enable strong private key protection so that no password will be required to use the certificate. Remove the reference to the PFX file in DeployMaster.
When you purchase a code signing certificate, the certificate is automatically installed on the computer that you used to make the purchase. To back up this certificate or transfer it to another computer, export the certificate including the private key. In Internet Explorer you can do this by going into Internet Options, Content tab, Certificates button, Export button. In the wizard, choose to export the private key. Then choose PKCS #12 (PFX) format and tick “include all certificates in the certification path if possible”. Then you will get a PFX file that includes everything that is needed for code signing.
If you have an EV certificate stored on a USB token then you can try to specify only the subject name of the code signing certificate. This works with certain USB tokens such as the Sectigo eToken.
If DeployMaster can’t find your EV certificate when you specify only the subject name then you need to specify the full path to signtool.exe. Signtool.exe is included with the Windows 10 SDK and Windows 11 SDK. The SDK is a free download from Microsoft. It is also included with development tools such as Visual Studio. When you provide the full path to signtool.exe you don’t need to specify the subject name or PFX file. Signtool automatically finds the code signing certificate stored on your USB token. If you have multiple valid certificates on your token then it will choose the one with the longest remaining validity period. You can provide the subject name of the certificate if you want Signtool to use a specific certificate.
If you have a SafeNet USB token then you should open the SafeNet Authentication Client, switch to the Advanced View, go into Client Settings, and tick “enable single logon”. This stops the SafeNet client from prompting for the USB token’s password for each and every file you want to sign. The password prompt may not appear when DeployMaster runs signtool.exe. In that case, use the Unlock Token button in the SafeNet Authentication Client before building your installer. With single logon enabled, you should need to do this only once each time you reboot your PC or unplug the token.
DeployMaster automatically passes the correct command line parameters when it runs signtool.exe. If you want to use a code signing application other than signtool.exe then you can specify a full command line (full path to the .exe plus command line parameters) to run that code signing application. You have to use the placeholder %FILE% on the command line to represent the file to be signed. DeployMaster checks whether you added %FILE% to the command line to distinguish between a full path to signtool.exe and a full command line to another code signing application. When %FILE% is present on the command line DeployMaster recognizes six additional placeholders. %DESCRIPTION% represents the name and version number of the application specified on the Project page. %URL% is the application URL specified on the Project page. %SUBJECT% is the subject name of the code signing certificate specified on the Media page. %PFX% is the path to the PFX file specified on the Media page. %TSURL% is the time stamping service URL selected on the Media page. %PWD% tells DeployMaster to ask for a password. It will do so the first time it needs to run a specific command line to sign a file. DeployMaster will remember the password until it needs to sign with a different command line.
You should sign your setup.exe as well as all .exe files that it installs. If you tick also sign unsigned .exe files added to the setup then DeployMaster signs all .exe files that haven’t been signed yet while building your setup. DeployMaster only checks whether the .exe files were signed at all. It will not replace the signature on .exe files that were signed with another certificate than the one you’re using.
Windows doesn’t show security warnings for .dll or .ocx files loaded by your application. But you can ask DeployMaster to sign unsigned .dll and .ocx files added to your setup. This allows your users or any security software they may use to verify that your .dll and .ocx files were not tampered with.
If you select Windows 7 or later on the Platform page then DeployMaster automatically uses a time stamping service to countersign your digital signature. This ensures that the signature remains valid even after the code signing certificate expires. Because of this, a working Internet connection is required for code signing to succeed. You can select any of the time stamping URLs from the drop-down list. The provider of the time stamping service does not need to be the issuer of your code signing certificate. Occasionally these time stamping services go down for maintenance or are unreachable because of network outages. When that happens, select a different URL and build your installer again. DeployMaster remembers the time stamping URL as a global setting. It is not stored in your .deploy file. This way you only need to change the time stamping URL once if your previous choice becomes unavailable.
If you only select Windows Vista or earlier on the Platform page then DeployMaster does not time stamp your digital signature. Time stamping services compatible with Windows Vista and earlier are no longer available. Applying a modern time stamp makes Windows Vista and prior treat the whole signature as invalid because they cannot verify the time stamp. Windows XP SP3 and Windows Vista will accept your digital signature without a time stamp until the code signing certificate that you used expires.
Windows XP SP2 and earlier versions of Windows will not accept any digital signature that you can apply today. Certificates compatible with Windows XP SP2 and prior are no longer issued.