On the files page, you will need to specify which files will be placed in the installation package and where (and if) they will be placed on the user’s system.
All files must be placed in folders, contained by components. In addition to files, you can also place shortcuts, URLs and other folders in folders.
A DeployMaster installation package consists of one or more components. These components cannot be nested. Give the component a meaningful name by editing its item in the tree view. At the bottom of the window, you can edit the component’s options:
Install component by default: When checked, the component will be installed, unless the user deselects it in the Select Components page of the installation program. Mark this checkbox for any component the typical user will want to install. Note that if the user does not click on the Custom Installation or Advanced Installation button, he will not be given the chance to select which components need to be installed. If a component must always be installed for the application to be useful, turn off the following option.
User can select whether this component is installed or not: When marked, the component will appear in the list of user selectable and deselectable components in the Select Components page. You should turn this off for components that are either absolutely required by the program and for components that must be installed when other components are installed, but serve no purpose without those components. In the latter case, specify the appropriate Requires settings. If the user can select the component, you should provide a detailed description of what purpose it serves, so the user (who probably has absolutely no experience with your application), can make a descent decision about whether she wants it or not. Note that if the user clicks on Advanced Installation, he will see the non-user-selectable components too (but will not be able to select or deselect them), so even then a good description is welcome.
Requires: In this list, you can mark all the components that are required by the currently selected component. If the current component is selected to be installed, all the components it requires will be installed as well. The user cannot override this. For components that are required by other components, but serve no purpose on their own, you should turn off both “install by default” and “user selectable”. This will make sure that the component is installed only when it is really needed.
See the Component Example for more information how to put these options to good use.
On the Windows system—like on most operating systems—files must be placed in folders. When you create a new component, DeployMaster will automatically add the standard folders to the fresh component. You can add files and shortcuts to these folders by selecting the folder and clicking on the appropriate button. You can also add subfolders to these folders. The folder items you see in the tree view on the files tab, are the folders as they will be created by your setup program on the user’s system. These are not related to the file organization on your development system.
If you place any files in the %WINDOWS% and %SYSTEM% folders, DeployMaster will automatically consider all those files to be shared files. The installation program will update the reference count for those files in the registry. The uninstaller will also update the reference count and only uninstall the files if the reference count becomes zero, indicating that the file is no longer in use.
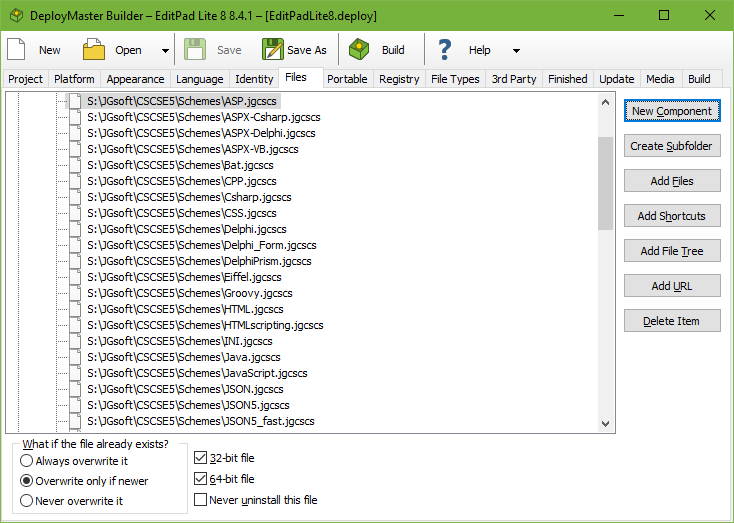
In the image above, you see a small sample. When I click on the Build button, DeployMaster will read the file S:\JGsoftPub\EditPadLite7\Win32\EditPadLite7.exe from my hard disk, compress it, and put it into the setup package I am building. Only the file name EditPadLite7.exe will be remembered. The information about where it was stored in my system is not retained. When the user installs the package, the file EditPadLite7.exe will be extracted and will be placed in %APPFOLDER%\EditPadLite7.exe, which will likely become C:\Program Files\Just Great Software\EditPadLite7\EditPadLite7.exe on the user’s system. It does not matter where I keep my development files on my own system. This is also true for the shortcut, which will be placed in %PROGRAMSMENU%, probably being C:\Users\UserName\AppData\Roaming\Microsoft\Windows\Start Menu\Programs\EditPadLite7.lnk on the user’s system. DeployMaster is smart and notices that S:\JGsoftPub\EditPadLite7\Win32\EditPadLite7.exe on my system becomes C:\Program Files\Just Great Software\EditPadLite7\EditPadLite7.exe on the user’s system. DeployMaster will make this shortcut point to exactly that file on the user’s system.
On Windows Vista and later, normal users can only write to C:\Users\TheirUserName\. All other folders on the C: drive require administrator privileges in order to be written to. If your application uses data files that should be shared by all users on the same PC and that should be writable by all users then you should put those files under %USERDATA% and turn the option “grant all users write access to this folder” for that folder. This option tells your installer to change the security permissions on that folder so that all users can write to it. On the Project page you can specify a subfolder %COMMONDOCUMENTS% or %COMMONAPPDATAROOT% as the default user data folder. Alternatively, if you want to hard-code these folders, you can add %COMMONDOCUMENTS% or %COMMONAPPDATAROOT% directly under a component on the Files page and create subfolders under them on the Files page. You can then turn on “grant all users write access to this folder” for your application’s subfolder.
Copying files to the user’s system is what an installation program is all about. So you will surely want to add some files to your package. Do this by selecting a folder in the tree on the files page, and then click the Add Files button. Select the files you want to add in the dialog box and they will be added to the selected folder. If you click on the Add Files button while you have a file or shortcut selected, the selected files will be placed in the same folder. Read the paragraph about folders to learn how DeployMaster will put the files on the user’s system.
Note that you can add the same file more than once to your setup package. DeployMaster will notice this and store it only once in the setup package. If the same file was added to different folders, it will still be stored only once but may be extracted several times. This is also true for files that you have used on the Project page, the background image and the Identity DLL. You will probably want to copy the readme file and license agreement file to the user’s system for future reference, in addition to having them show up in the installation program. They also will be stored only once in your installation package. If your identity DLL needs code that your application also uses, you may just as well add the identity functions to an application DLL and use that DLL as the Identity DLL in addition to installing it on the user’s system where it will be used in your application’s daily life.
For each file, you can also decide what should happen if the target file already exists on the user’s system. You can choose to always overwrite, never overwrite or only overwrite if the file to be installed is newer than the one that already exists. In case of executable files (.exe, .dll, etc.), DeployMaster uses the versioning information stored inside such files to determine which file is more recent. For all other files, DeployMaster uses the file’s modification date. You can also make this setting for all files in a folder by selecting the folder and making the setting for the folder.
If you select “never overwrite” for a file, then you can turn on the option to never uninstall that file. Select this option if DeployMaster should not, under any circumstances, delete that file. Even if the user uninstalls your software, the file will stay behind.
If the file is an .exe or .bat file, an extra option labeled “execute during installation with these parameters”. When checked, Deploymaster will run the executable file or batch file after all files have been copied. The executable will be run with administrative privileges, except when a portable installation is being created. You can specify command line parameters to be passed to the executable. In most cases you will want to turn on “wait for completion” to make your installer wait for the executable to stop running before telling the user the installation has completed successfully. If you turn on “delete after execution”, then the file will be deleted when it completes running. This option is intended to run self-registering libraries and other helper executables that must be run to perform extra installation tasks that DeployMaster cannot do on its own. You should not use this option to run the actual application you’re installing. For that there’s a separate option on the Finished page, which runs the application with normal user rights. You also should not use this option for 3rd party installers. Add those on the 3rd Party page instead.
If the file you are adding is a .dll or .ocx code library, an extra option labeled “register this DLL upon installation” will appear. When checked, DeployMaster will invoke regsvr32 to register the DLL or OCX after installing it. For .tlb files, an option “register this library upon installation” will appear. When checked, DeployMaster will load and register the .tlb file after all files have been installed.
For each file you can select whether it is a 32-bit file or a 64-bit file. Tick both options for files that should be delivered with both the 32-bit and 64-bit versions of your application. If your application is 32-bit only or 64-bit only, simply leave both options turned on.
If you selected one of the two “32-bit application” options on the Platform page, then only files that have “32-bit file” checked are included in the installer that DeployMaster generates. All those files will be installed. If you selected one of the two “64-bit application” options on the Platform page, then only files that have “64-bit file” checked are included in the installer. All those files will be installed. If you add both the 32-bit and 64-bit files to the Files page and select the correct bitness for each file, then you can build separate 32-bit and 64-bit installers from a single DeployMaster setup script, simply by changing the target bitness on the Platform page.
If you selected the “32-bit and 64-bit application” option on the Platform page, then all files are included in the installer. If the user is running 32-bit Windows, the installer will only install files that have “32-bit file” checked. If the user is running 64-bit Windows, the installer will only install files that have “64-bit file” checked.
As the example in the screen shot shows, you can place two files with the same name in the same folder. Just make sure that only “32-bit file” is checked for one file and only “64-bit file” is checked for the other file.
Note that the “32-bit application for 32-bit Windows and 64-bit Windows” results in a pure 32-bit installer. Only 32-bit files will be installed, even if the user is running 64-bit Windows. If you want the installer to install different files depending on whether the user is running 32-bit or 64-bit Windows, then you have to select “32-bit and 64-bit application” on the Platform page.
To make life easier for your users, you should place a few shortcuts, in strategic locations, to the files created by your installation package. It is probably a good idea to place a shortcut to your application in the %DESKTOP% folder, and to place shortcuts to all important files in the %APPMENU% folder. You can specify the default %APPMENU% folder on the Project page. %APPMENU% should be a subfolder of %PROGRAMSMENU%. Shortcuts that you place under the %PROGRAMSMENU% and %APPMENU% folders can be accessed via the Programs or All Programs item in the Start Menu in Windows 95 until Windows 7.
To add a shortcut, select a folder and click the Add Shortcuts button. Select the files you wish to create shortcuts to. As illustrated in the example in the folders section, DeployMaster will figure out where the file you selected on your system ends up on the user’s system, and will set the shortcut’s target appropriately. If that file is copied more than once to the user’s system (a rare case), the you cannot be sure which copy the shortcut will point to. But since all the copies are identical, the user should not notice this.
If you are creating a shortcut to a file that is not being installed on the user’s system, that shortcut will not be created. This ensures that there will be no broken shortcuts on the user’s system. The situation could arise when the target file is in another component that the shortcut, and the shortcut’s component is being installed and the file’s component is not. You can take advantage of this fact and create one component containing all shortcuts (and only shortcuts) the user might need, and to put the files in other components. By making this shortcut component user selectable, you can please users who do not like software to mess with their nicely crafted start menu. If the user does want the shortcuts, he will only get those that correspond with files that have actually been installed.
If your installer targets both 32-bit and 64-bit Windows and includes separate 32-bit and 64-bit .exe files, then you’ll need to add shortcuts to both the 32-bit and 64-bit .exe files too. This means that for each pair of 32-bit/64-bit .exe files, you’ll have a pair of shortcuts pointing to that pair of .exe files. Since only one of the .exe files of each 32-bit/64-bit pair will be installed, only one of each pair of shortcuts will be created.
If the shortcut points to an executable file, the default icon is the first icon in the executable. You can immediately select a different icon from the same .exe file. For all other files, the default icon is whichever icon is used to indicate files of that type on the user’s system. So if you are creating a shortcut to an HTML file, for example, the default icon will be the icon of the user’s web browser. As a preview, DeployMaster shows the icon used on your system. That does not mean this icon is added to your installer.
If you want to select a different icon, click the Icon File button and then click Select. Choose the .exe, .dll, or .ico file that contains your icon. This file needs to be added as a file to the Files page under %APPFOLDER% or another folder appropriate for installing files. It does not need to be in the same folder as the shortcut or as the file that the shortcut points to.
Windows 8 introduced a new Start Screen that replaced the Start Menu that was used by Windows 95 until Windows 7. Shortcuts that you place under the %PROGRAMSMENU% and %APPMENU% folders can be accessed via the Windows 8 Start Screen by right-clicking on the Start Screen and then clicking “All apps” in the bottom right corner.
Shortcuts can also have their own tiles directly on the Windows 8 Start Screen, so the user can access them without having to go through “All apps”. Such shortcuts are “pinned”. When you select a shortcut on the Files tab and that shortcut is inside the %PROGRAMSMENU% or %APPMENU% folder, the Windows 8 option at the bottom of DeployMaster’s window will become enabled. You have three choices that determine whether the shortcut will be pinned to the Start Screen:
Note that these options only take effect the very first time the shortcut is created. Windows 8 may ignore your choice on subsequent installations, even if your application was uninstalled and reinstalled. If the user decides to pin or unpin a shortcut, your installer cannot override that choice. So if you want to test your installer with different Windows 8 pinning choices for your shortcuts, you have to perform each test on a copy of Windows on which your software was never installed. The best way to do this is with a clean install of Windows in a virtual machine that you can roll back to its clean state after each test.
These options do not have any effect on Windows 8.1 even though it uses a Start Screen very similar to Windows 8. They also have no effect on Windows 10, which has a Start Menu that combines the features of the traditional Start Menu from Windows 7 and prior and the live tiles from the Windows 8 Start Screen. On Windows 8.1 shortcuts your installer puts under %APPMENU% or %PROGRAMSMENU% can be accessed via All Apps in the Start Screen. On Windows 10 they appear directly in the Start Menu. The user can create a tile for your application on the Start Screen or Start Menu by right-clicking its icon under All Apps or its desktop icon and selecting Pin to Start.
If you are primarily targeting Windows 8.1 and later, then you should place a single shortcut to your application under %PROGRAMSMENU% on the Files page. Then your application will be listed directly under All Apps in alphabetic order with all the other applications. That’s where people using Windows 8.1 and later will expect to find it. The %PROGRAMSMENU% folder puts shortcuts directly under All Apps and cannot be changed by the user. Then you won’t use %APPMENU% and shouldn’t specify a default for it on the Project page. However, if previous versions of your installer used %APPMENU%, then you should continue to place your shortcuts under %APPMENU%. You can change the default folder for %APPMENU% to %PROGRAMSMENU% without a subfolder on the Project page. You should also turn off the option to create a shortcut to the uninstaller on the Finished page.
Adding additional shortcuts to help files, web sites, uninstallers, and the like is no longer recommended. Applications are expected to put just one shortcut on the Start Menu. But if you want the additional shortcuts, you should put all your shortcuts under %APPMENU% on the Files page. Set the default start menu folder on the Project page to %PROGRAMSMENU%\Your App. On Windows 8.1 this will create a section Your App under All Apps on the Start Screen. On Windows 10 this will place a folder Your App in alphabetic order on the Start Menu. Clicking this folder expands it to show your shortcuts. The user can select a different folder for %APPMENU% via Advanced Installation.
Do not place shortcuts under both %PROGRAMSMENU% and %APPMENU%. Either place a single shortcut under %PROGRAMSMENU%, or place one or more shortcuts under %APPMENU%.
To create a shortcut to a web page, click the Add URL button. This will create a new item in the file tree where you can type in the URL. If you want to give the shortcut a descriptive name, rather than having it show the URL, type it into the Name field.
The default icon for URLs is the icon used by the user’s default web browser. You can select another icon if you want. This icon can be extracted from any .ico, .exe or .dll file that will be installed by your installation package.
To install fonts and make them available to all applications, simply add the .ttf and .otf files with TrueType and OpenType fonts or .fon files with bitmapped fonts to %FONTS% folder. Your installer will then automatically put your fonts into the Windows fonts folder and register the fonts so they’ll be available to all applications. You should not put any other files into the %FONTS% folder. Installing fonts into %FONTS% requires administrator privileges.
If your application uses private fonts that you don’t want to be available to other applications, simply put them under %APPFOLDER% with your application. Your application will then need to call the AddFontResource() Windows API function each time it runs to make the font available to itself.