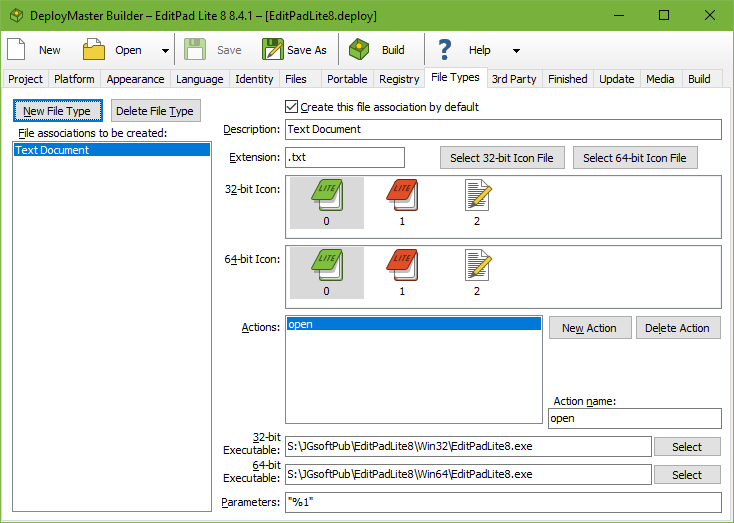
On this page, you can associate various file extensions with your software.
The option “create file association by default”, determines whether the file association will be created or not, if the user does not use the Advanced Installation button when installing your software. You should always keep this checkbox marked, except when you want to associate your application with standard extensions such as .txt, .html, etc. Many people do not want any software to take control of standard file extensions.
If the user selects Advanced Installation when running your setup, he is given the chance to prevent your setup from creating some or all file associations. Some users really do not like software messing with their file associations.
Each file association requires a description, which will appear in the Type column in Windows Explorer. Of course, an extension also needed. It should be specified in the form of .ext.
The icon for the file association must be stored in a file that you’ve added to the Files page in DeployMaster. If this file is an .ico file, use the Select 32-Bit Icon File button as well as the Select 64-Bit Icon File Button to select this .ico file twice. On the Files page, both the “32-bit file” and “64-bit file” checkboxes should be checked for .ico files. Icon files do not have any bitness.
If the icon for the file association is stored in an executable file or dynamic link library, and you have selected one of the two “32-bit application” options on the Platform page in DeployMaster, use the Select 32-bit Icon File button to select the .exe or .dll. Make sure that “32-bit file” is checked for this file on the Files page. For 32-bit applications, the file association will use the 32-bit icon even when installing on 64-bit Windows. If you have selected one of the two “64-bit application” options on the Platform page, use the Select 64-bit Icon File button to select the .exe or .dll. Make sure that “64-bit file” is checked for this file on the Files page. The 32-bit icon setting is not used by 64-bit installers. If you have selected “32-bit and 64-bit application” on the Platform page, then you need to use the Select 32-bit Icon File button and pick an .exe or .dll file for which you have ticked “32-bit file” on the Files page. You also need to use the 64-bit Icon File Button to pick a file for which you have ticked “64-bit file” on the Files page.
After selecting the file(s) containing the icon you want to use, the “32-bit icon” and/or “64-bit icon” lists will show the icons stored in the selected file(s). If more than one icon is shown, click on the icon that the file association should use.
To make the file association work, you will need to add one or more actions for this file type. One of the actions should be named “Open”. This action will be executed when the user double-clicks on a file of this type in Windows Explorer. This action should do whatever is most common for this type of file. A file association for HTML files would show the file in a web browser. Another common action is “Edit”. This action should allow the user to edit the file. Add this action if the “open” action does not allow the file to be edited. Since web browsers don’t allow HTML files to be edited, an HTML file association could use the “edit” action to open the HTML file in a text editor.
You are not restricted to these standard actions. You can add as many actions specific to your file type as you like. If your files often need to be transmogrified, add a new action and enter Transmogrify as the name. You should capitalize the name’s first letter, so it’ll fit nicely with the other items in the right-click menu in Windows Explorer. That’s where all of your file type’s actions will appear.
For each action, you must select an executable file that will perform the action. This executable must be one that is installed by your setup package, so it must have been added to the Files page. If the user deselected the component that contains the executable (and thus it is not installed on the user’s system), DeployMaster will not create this action. If all of a file type’s actions should be handled by an executable that is not being installed, DeployMaster will not create that file type altogether. This ensures that there will be no broken file associations on the user’s system created by your software product. This also means that you can safely add any file types on this page that are used only by special components of your software. If the component is not installed, its file types aren’t either.
If you’ve selected one of the two “32-bit application” options on the Platform page in DeployMaster, then you only need to specify a 32-bit executable for the action. Make sure that “32-bit file” is checked for this file on the Files page. For 32-bit applications, the action will use the 32-bit executable even when installing on 64-bit Windows. If you have selected one of the two “64-bit application” options on the Platform page, then you only need to specify a 64-bit executable for the action. Make sure that “64-bit file” is checked for this file on the Files page. If you have selected “32-bit and 64-bit application” on the Platform page, then you need to specify both a 32-bit executable and a 64-bit executable for the action.
For each action, you can also specify a parameter list that will be passed on the executable’s command line. Even if you do not seem to have a need for any parameters (very likely with an “open” action), it is a very good idea to specify “%1” (including the quotes!) in the Parameters field. This parameter will cause quotes to be placed around the file the action should be performed upon, preventing files with spaces in their names from being broken into pieces.
DeployMaster’s uninstaller will automatically remove all file associations were created by the installer. If the installer modified existing file associations, the uninstaller will revert them to their previous state.
Before removing or reverting a file association, the uninstaller checks whether the file association is still what your installer put into place. If the file association was modified after your application was installed, then the uninstaller will leave it alone. The uninstaller won’t break any file associations that were taken over by other software.
This also means that if your software creates or modifies file associations after it was installed, then your software will be responsible for removing those file associations. You can do this via the “program to execute before starting uninstallation” option on the Finished page.